Get started
Audience. New user.
About ten minutes, four steps, a checkpoint after each one so you always know whether it worked:
- Install — you have a
condashbinary. - Open a folder — you have a conception tree.
- Create your first project — you have a
README.mdon disk. - Make one edit — you have proof the file is the database.
Then what you're looking at maps the rest of the window.
What a conception is
A conception is the folder condash renders. It is a plain directory — usually a git repo — with a shape condash recognises:
conception/
├── projects/
│   └── 2026-07/
│       └── 2026-07-26-try-condash/
│           ├── README.md          ← one item = one folder, one README
│           ├── notes/             ← long-form working notes
│           └── deliverables/      ← PDFs, exports, anything you produced
├── knowledge/                     ← durable reference notes, not tied to an item
├── resources/                     ← loose files you want at hand
└── .condash/settings.json         ← which repos and paths this tree knows about
Only two things are load-bearing: items live at projects/<YYYY-MM>/<YYYY-MM-DD>-<slug>/README.md, and that README carries a small YAML frontmatter block. Everything else is free-form Markdown, and knowledge/ and resources/ are optional — their panes render an empty state until the directory exists. Full shape: README format.
You do not have to build any of this by hand — step 2 offers to lay it down for you.
Install
Download for your OS from github.com/vcoeur/condash/releases/latest:
| OS | Asset |
|---|---|
| Linux | condash-<version>.AppImage or condash_<version>_amd64.deb |
| macOS | condash-<version>-arm64.dmg |
| Windows | condash.Setup.<version>.exe |
gitmust be onPATH— condash shells out to it for repo status. Linux distros ship it; on macOS install Xcode CLT (xcode-select --install); on Windows use Git for Windows.
One binary covers both faces of condash: run condash with no arguments and you get the dashboard; run condash <anything else> and you get the CLI. There is no separate condash-cli — that alias was removed in v3.0.0.
Linux — apt repository (recommended for Debian/Ubuntu)
A signed apt repository at condash.vcoeur.com/apt/ lets apt track new versions for you.
sudo install -d -m 0755 /etc/apt/keyrings
curl -fsSL https://condash.vcoeur.com/apt/pubkey.asc \
  | sudo gpg --dearmor -o /etc/apt/keyrings/condash.gpg
echo "deb [signed-by=/etc/apt/keyrings/condash.gpg] https://condash.vcoeur.com/apt stable main" \
  | sudo tee /etc/apt/sources.list.d/condash.list
sudo apt update && sudo apt install condash
Then sudo apt update && sudo apt upgrade covers updates.
The apt window includes prereleases
The index is rebuilt from the most-recent 5 releases, and that window is not filtered on release channel — a -rc.N / -alpha / -beta tag is a normal entry in it. So apt install condash can hand you a prerelease. If you want stable only, download the .deb from a plain vX.Y.Z release instead. See Releases.
Older versions stay downloadable as .deb from each release on github.com/vcoeur/condash/releases — just outside apt resolution.
Linux — AppImage
If the window doesn't appear, install Electron's runtime deps:
sudo apt install libnss3 libatk-bridge2.0-0 libgtk-3-0 libgbm1   # Debian/Ubuntu
sudo dnf install nss atk at-spi2-atk gtk3 mesa-libgbm             # Fedora
macOS
The build is unsigned and not notarized. Bypass Gatekeeper once:
- macOS 14 and earlier: Finder → control-click
condash.app→ Open. - macOS 15+: double-click → dismiss the warning → System Settings → Privacy & Security → Open Anyway.
If macOS still refuses with "damaged":
Windows
Double-click the installer. Windows shows "Windows protected your PC" — click More info → Run anyway. Each new release re-prompts (expected for unsigned binaries).
The installer appends its install directory to your per-user PATH, so condash is reachable from any new shell. Already-open shells need restarting to pick up the change. Uninstalling does not remove the entry: a stale PATH entry pointing at a deleted directory is harmless on Windows, and the install side dedups so reinstalls never accumulate duplicates.
Checkpoint — you have the binary
If that prints a version, condash is installed and on PATH. (On macOS the .app launches from Finder or the Dock; the command name is on PATH only if you put it there yourself.)
First launch
Nothing opens automatically. Launch condash and you get one line of text and one button:
Pick a conception directory to list its projects.
[ Choose folder… ]
Click it — or use File → Open… (Ctrl+O) — and pick any directory. ~/conception is a fine choice. condash remembers it in the per-machine settings.json (key lastConceptionPath) and reopens it next time.
Let condash build the tree for you
If the folder you picked is missing projects/ or a config file, condash offers to seed it:
Initialise from template? This folder is missing projects/ and a condash config file.
Initialise it from the bundled conception template? Skill files, seed indexes, and example config will be laid down. Existing files are left alone.
[ Cancel ] [ Initialise ]
Click Initialise. condash copies its bundled conception-template/ in and you get a working tree in one click:
AGENTS.md                     instructions for AI agents working in this tree
.gitattributes
.condash/settings.json        per-conception config (repos, workspace path)
.claude/settings.json         Claude Code settings + one hook
.agents/skills/               the five shipped skills: applications, knowledge,
                              pr, projects, visual
projects/index.md             seed index
knowledge/                    index.md, conventions.md, external/, internal/, topics/
A skill is a Markdown instruction file for an AI coding agent — Claude Code, for example — and condash ships five (projects, knowledge, pr, applications, visual), installing them into your tree under .agents/skills/.
Each is invocable as a slash command — /projects, /knowledge, /pr, /applications, /visual — in an agent session whose harness has the skills installed. Which skill handles which task, and what each wraps in the CLI: Management skills.
Existing files are never overwritten — running this against a folder that already has some of these leaves them exactly as they are, and only the missing files are created. A toast reports how many were written.
This is strictly better than making the directories yourself: a bare mkdir projects/ gives you no config, no seed indexes, and no skills, and condash will re-offer the init prompt the next time you pick that folder — the probe runs when a folder is chosen, not on every launch.
Already have a Markdown tree?
Two ways to try condash against it without changing your default:
CONDASH_CONCEPTION_PATH=/path/to/tree condash— a session-only override. It wins for that launch and is never written back tolastConceptionPath, so your usual tree is untouched next time you start condash normally.- File → Open Recent keeps the last 5 trees you opened, with Clear menu at the bottom. Switching is one click, no dialog.
Fuller treatment: Configure the conception path.
Checkpoint — you have a conception tree
The window grows a status bar along the top: conception <your path> on the left, and on the right a counts string like 10 projects · 5 repos. If the status bar is there, condash has your tree. On a brand-new tree the counts string is empty — correct, you have no items yet.
Your first project
The Projects pane is showing five empty sections — NOW, REVIEW, LATER, BACKLOG, DONE. There are three ways to open the create-item modal, all equivalent:
- the + New project ▾ button riding the
NOWsection header, - the + New button in the pane header,
- File → New project… (
Ctrl+N).
…unless you're looking at the Welcome screen instead
On a tree that has no projects and no knowledge/ content, condash shows a Welcome screen with four cards — Create your first project, Open my tree, Read the welcome doc, Open the documentation site — plus the tree path with an inline edit button that jumps to Settings, and a Don't show this again link.
The template init seeds knowledge/, so a folder you just initialised shows the Welcome screen once anyway — the init marks it to appear a single time — and it does not reappear on later launches. You'll also see the Welcome screen if you point condash at a bare directory and decline the init, or open a tree you manage entirely from your editor.
The modal is titled New project and asks for four things, in this order:
| Field | What to enter |
|---|---|
| Title | Anything. "Try condash" is fine. |
| Slug | Auto-derived from the Title and shown as a preview — click edit to override. |
| Kind | project, incident, or document. Leave it on project. |
| Status | now, review, later, or backlog. Leave it on now. (done is deliberately not offered here.) |
Picking Kind = incident reveals three more: Environment, Severity, and Severity impact. There is no Apps field — apps, branch, and base are things you add later by editing the README or from the item's popup.
Click Create. condash writes projects/<YYYY-MM>/<YYYY-MM-DD>-try-condash/README.md, creates an empty notes/ beside it, and opens the item:
---
date: 2026-07-26
kind: project
status: now
apps: []
---

# Try condash

## Goal

<What this project aims to achieve — the user-facing outcome.>

## Scope

<What is in scope and what is explicitly out of scope.>

## Steps

- [ ] <first task>

## Timeline

- 2026-07-26 — Project created.

## Notes
Incidents and documents get different bodies — an incident scaffolds Description / Symptoms / Analysis / Root cause instead of Goal / Scope.
You can also create items entirely by hand: make the directory, drop a README.md with that frontmatter in it, and condash picks it up live. Or from a shell:
(The CLI's create is stricter than the modal: --kind, --slug, and --title are required; --apps is optional and defaults to empty.)
--apps names the app(s) the item touches — an app is a registered repo identity condash tracks, referenced by its #handle (e.g. #condash); the README's apps: field is what links an item to those repos. See Applications and handles.
Checkpoint — you have a file on disk
condash names the directory from the day you created the item, so the two date calls just fill in today's.
That file is the whole item. Nothing else was written anywhere.
Watch the file change
This is the part worth thirty seconds, because it is the entire premise.
- In the dashboard, click your new item's card to open it. Under Steps, click the marker button to the left of
<first task>. - Back in the shell,
catthe README again.
The line is now - [~] <first task>. Clicking cycles the marker [ ] → [~] (in progress) → [x] (done) → [-] (dropped) → back. The dashboard did not update a record about your file — it rewrote that one line, in place, and nothing else: a change you could have made with sed. In a conception you keep in git, that is exactly what git diff shows — one line. (Initialising from the template lays down files, not a repository, so git init and a first commit come first if you want to watch it that way.)
The same holds in the other direction: edit the README in your editor, save, and the card updates without a refresh — a filesystem watcher pushes the change. Two writers, one file, no sync.
Every write condash is capable of is enumerated in Mutation model. It is a short page on purpose.
What you're looking at
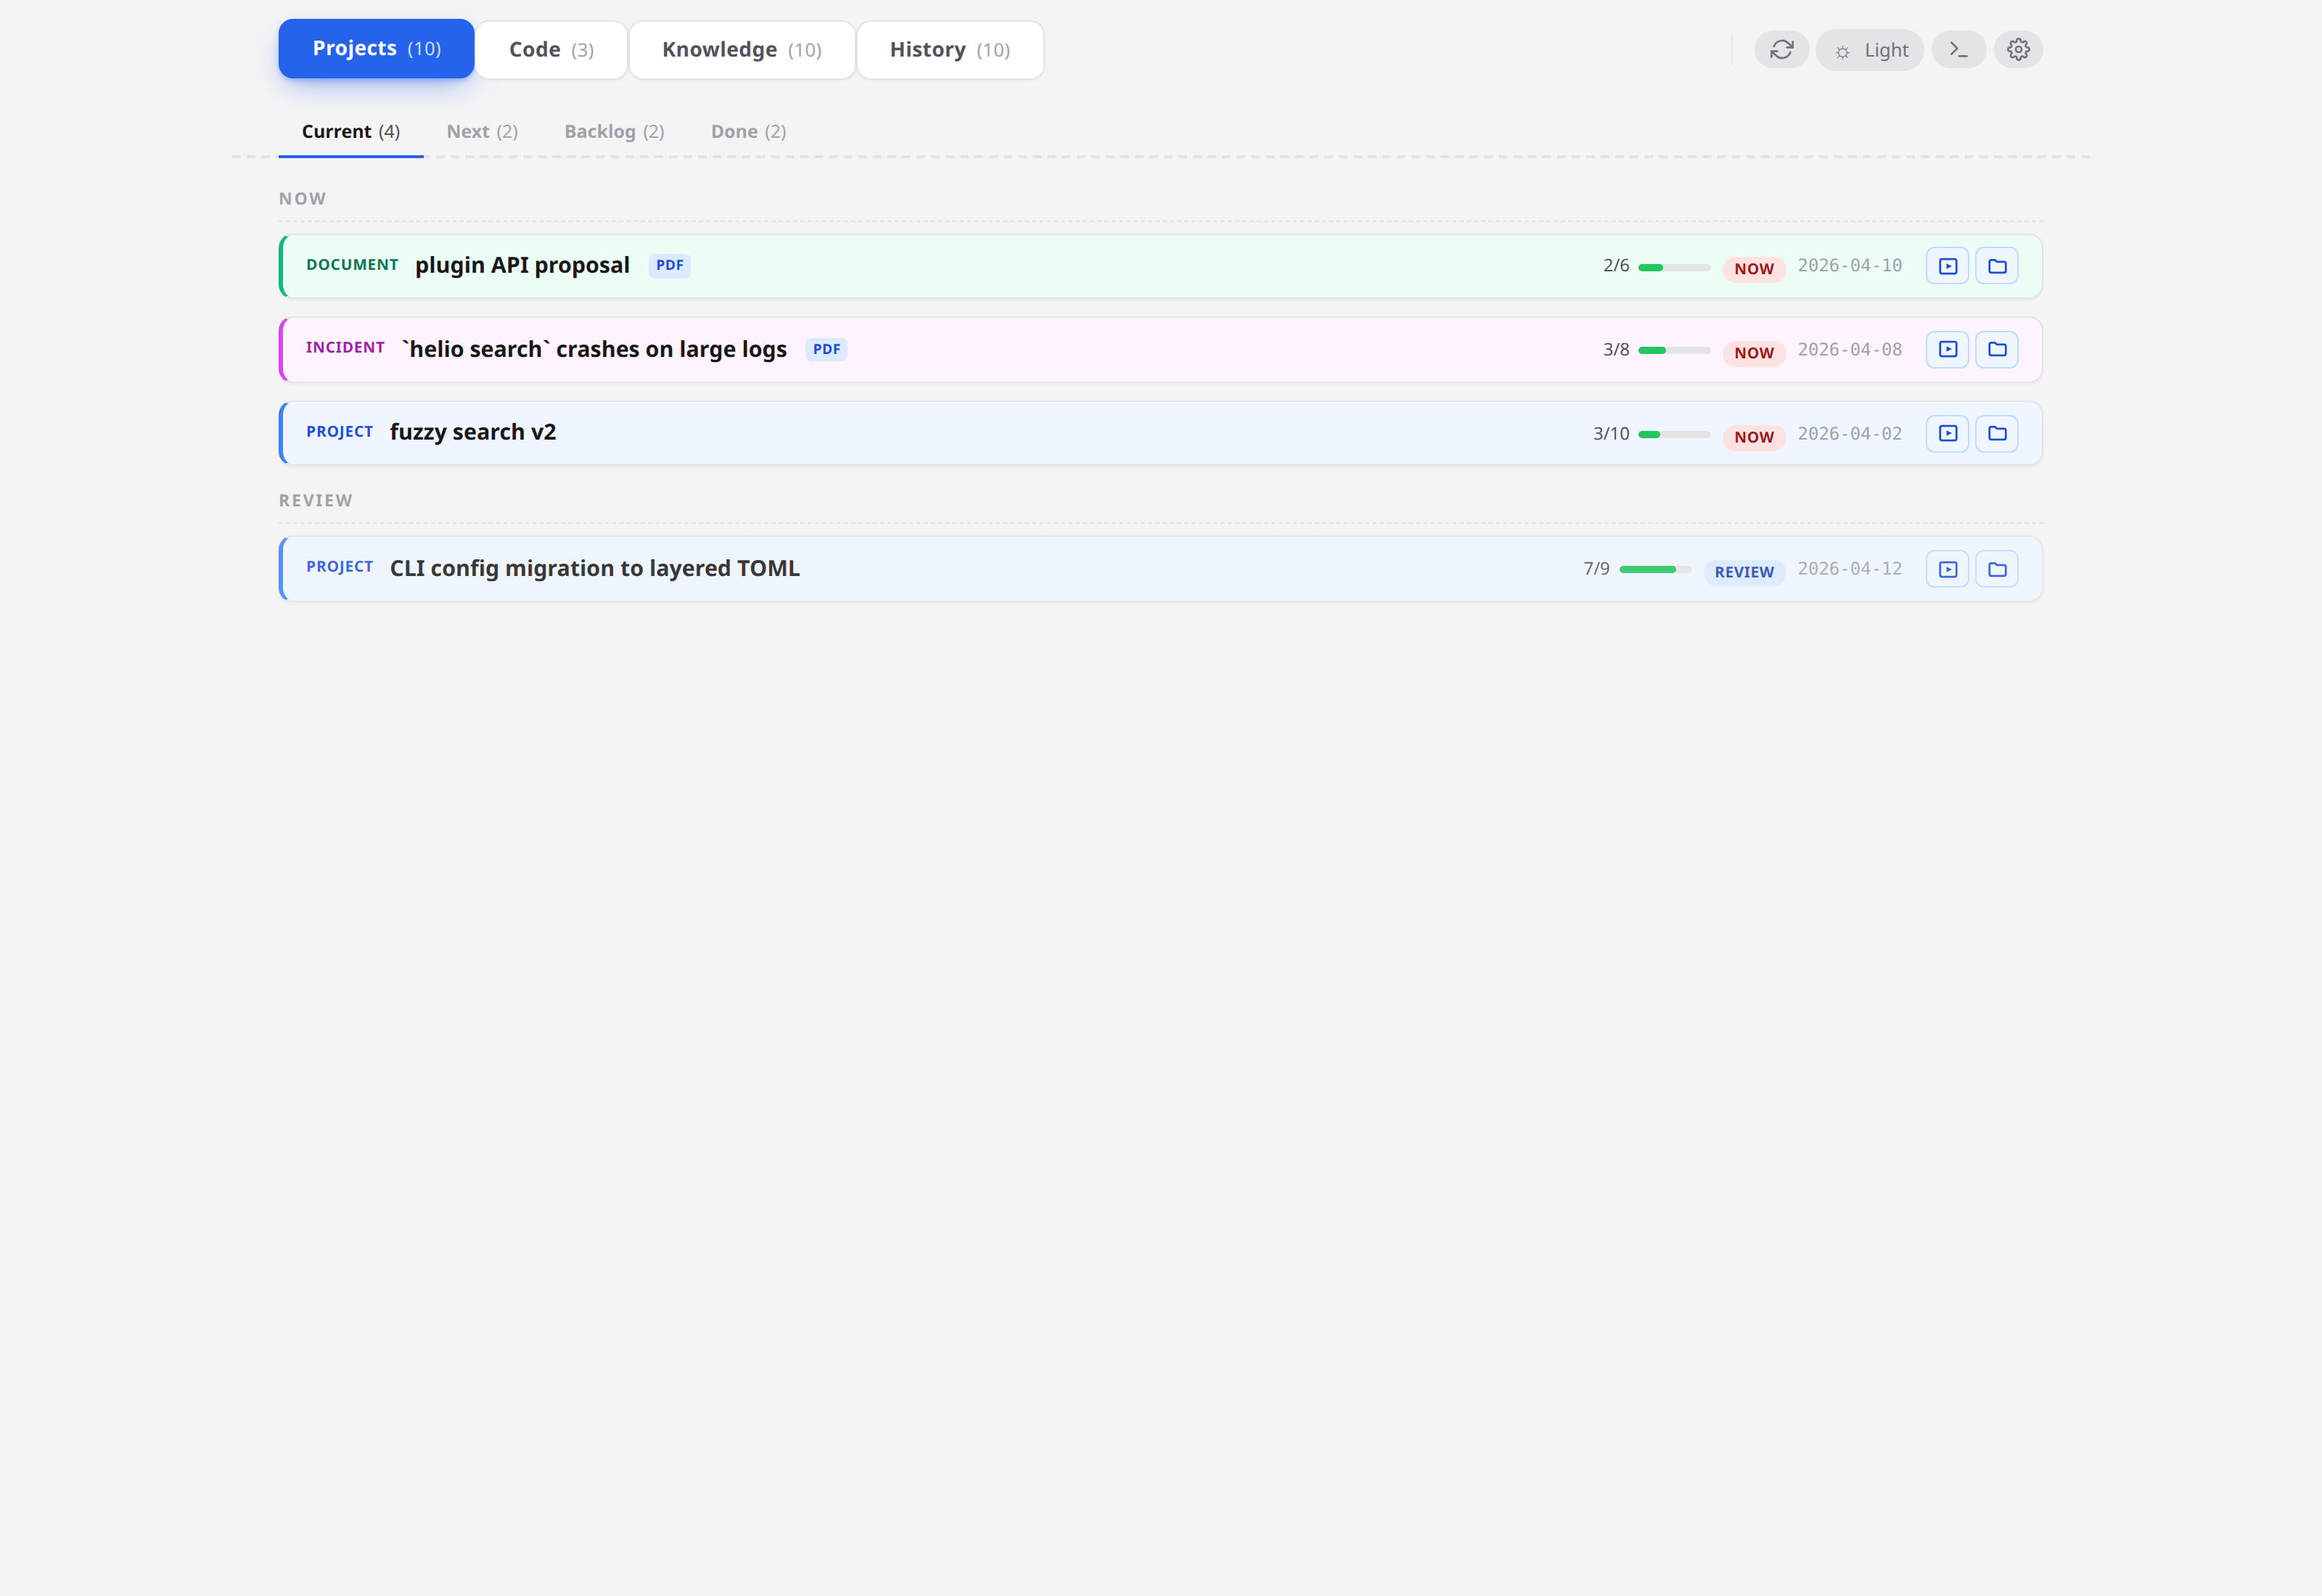
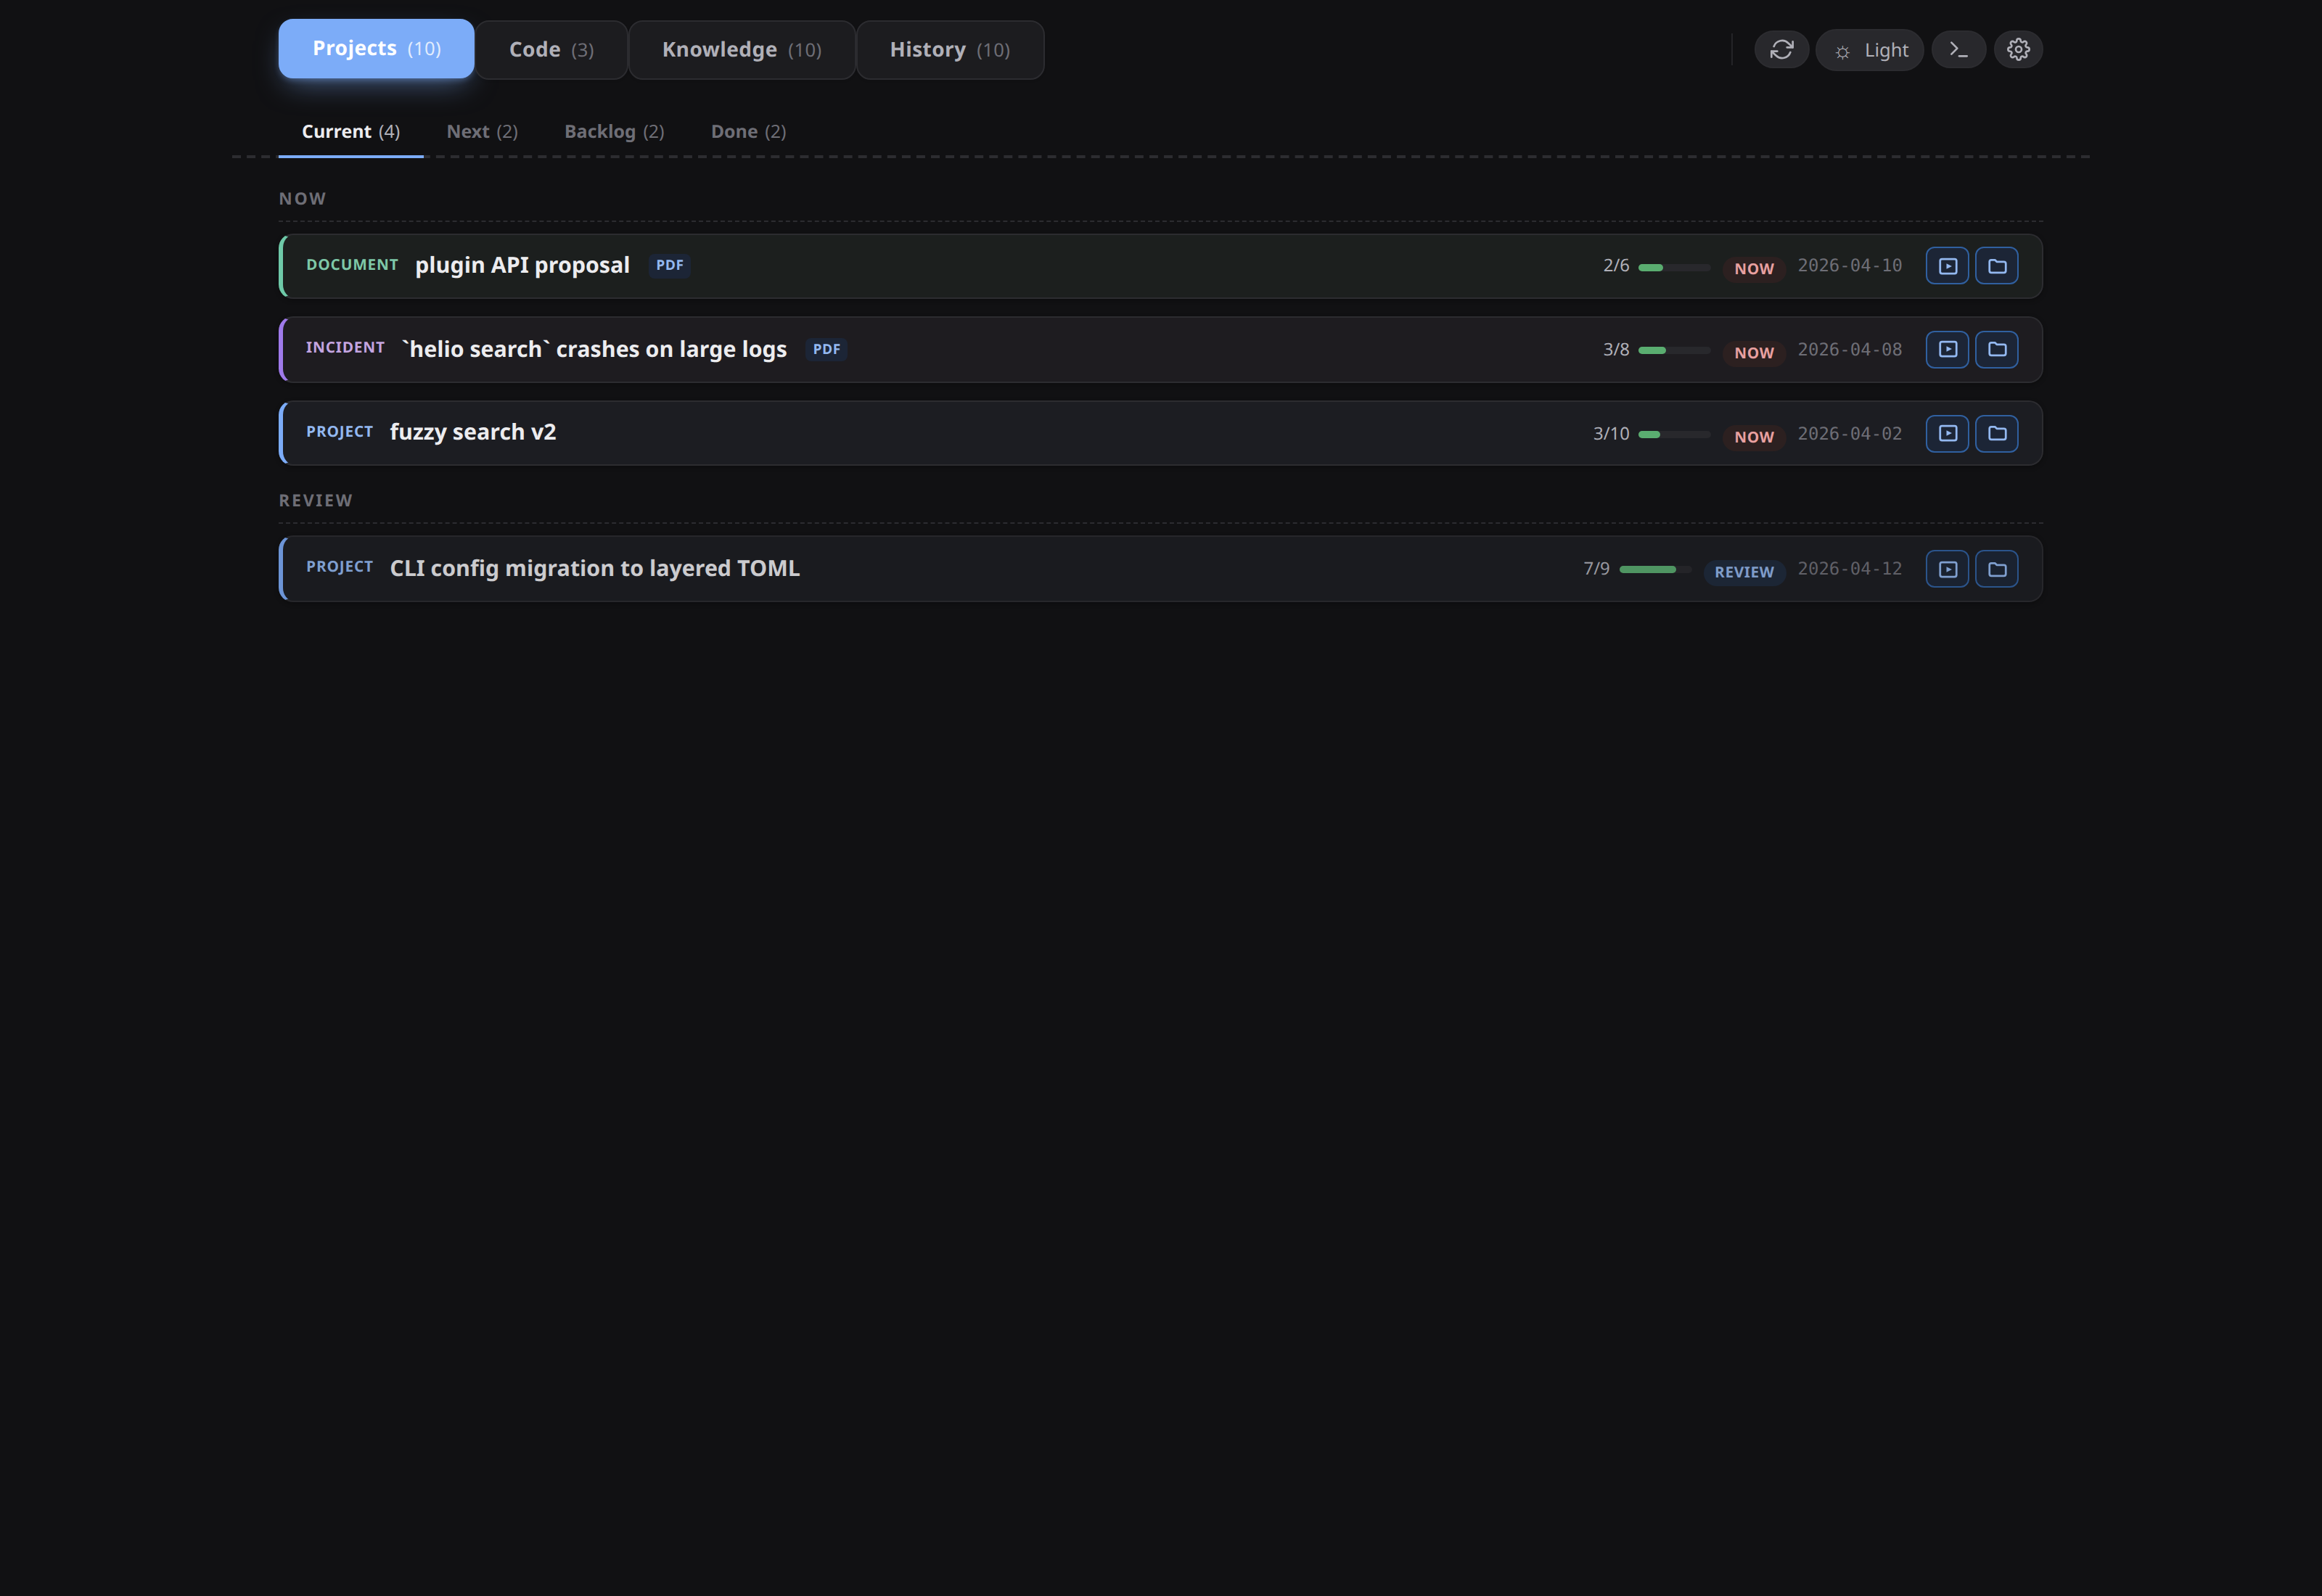
The three surfaces you'll use on day one
Projects (left) renders your items as one scrolling stack of status sections, in the order now, review, later, backlog, done — plus a trailing ? section for any item whose status: isn't one of those five. backlog and done start collapsed; done further subdivides into "closed in the last 7 days" plus one collapsible subgroup per month.
Three ways to change an item's status: drag its card to another section, press Ctrl/Cmd+1…5 with the card focused, or click the status pill in the item modal's header. All three rewrite the README's status: line.
Code (right) lists the git repos this tree cares about, each with its branches, a N dirty pill you can click for the file list, and per-branch Run / open a shell here / Open with… actions. It is empty until you set workspace_path and repositories — Settings → Workspace & paths + Repositories, or .condash/settings.json directly. See The Code pane.
Terminal (bottom) is a real shell session — your $SHELL — in the same window. Toggle it with Ctrl+` or View → Show Terminal; the New shell ▼ dropdown in its header opens more tabs and any agent CLI you've configured. See Use the embedded terminal.
Everything else
The activity rail down the left edge switches between four left-hand views and five right-hand working surfaces. The right-hand five are mutually exclusive — picking one swaps out whichever was showing.
| Rail item | Shortcut | What it is | Guide |
|---|---|---|---|
| Projects | — | Your items, grouped by status | The Projects pane |
| Tasks | — | Reusable agent prompts, saved once and run in two clicks | Tasks pane |
| Deliverables | — | Every item's ## Deliverables, aggregated across the tree |
Deliverables pane |
| Performance | — | Live per-terminal memory, growth rate, and throttle state | Performance pane |
| Code | Ctrl+Shift+C |
Repos, branches, dirty counts, launchers | The Code pane |
| Knowledge | Ctrl+Shift+K |
knowledge/ as a browsable card tree |
The knowledge tree |
| Resources | Ctrl+R |
Every file under resources/, any extension |
Resources pane |
| Skills | Ctrl+L |
The Markdown skills under .agents/skills/, read-only |
Skills pane |
| Logs | Ctrl+Shift+L |
Saved terminal-session transcripts | Logs pane |
Not on the rail:
- Dashboard (
Ctrl+Shift+D) — not the app itself: a bottom band that shares its space with the terminal and summarises what each terminal tab is doing. Off by default. Guide. - Search (
Ctrl+Shift+ForCtrl+K) — one modal across projects, knowledge, resources, skills, and (on request) logs. Guide. - Status-bar indicators — the auto-commit state with a Sync now button, and the shipped-skills state with an Install button that runs
condash skills installfor you. See Auto-commit and Extend the management skills.
The CLI you already installed
CLI-first users can bootstrap a fresh tree headlessly with condash init [--path <dir>] — the same bundled template the first-launch dialog lays down. The same binary is a command-line tool against the same tree. Nothing extra to install — these six cover a normal day:
# What's active right now?
condash projects list --status now,review

# Create a new item without touching the dashboard.
condash projects create --kind project --slug <slug> --title "<Title>" --apps <app>

# Find anything, across projects, knowledge, resources, and skills.
condash search "<query>"

# Materialise a branch-isolated checkout at <worktrees_path>/<branch>/<repo>.
condash worktrees setup <branch>

# Which management skills are installed in this tree?
condash skills list

# Read one config key — e.g. worktrees_path.
condash config get <key>

# Machine-readable output, for scripts and jq.
condash projects list --json | jq '.data[]'
Full noun-by-noun reference: CLI.
Next
- A day with condash — you have one item; this is what a working day with a tree full of them looks like.
- Guides — one page per surface, when you want to go deeper on a specific one.
- Releases — what the version numbers mean and how upgrades work.
- Why Markdown-first — the reasoning behind all of it.